To add a new performance to the UKCultureHub Performances Marketplace and make it available for booking, you’ll need to create a bookable product. This guide provides step by step guidance on how to set it up.
Note if you have already created a similar bookable product you may find it quicker to create a duplicate of the existing product, and just edit the elements that are different. You can create a duplicate product by going to Products > All Products and then when your cursor hovers over the relevant product you can select Duplicate. Don’t forget to at least edit the Product Name before saving it.
Note also if you have started creating a bookable product and saved it, you can always go back and edit it by going to Products > All Products and then when your cursor hovers over the relevant product you can select Edit.
Note that UKCultureHub personnel review all new products that you submit before release onto the marketplace. This is a review for suitability for release and not a quality test. The quality and accuracy of the content you provide always remain your responsibility and we recommend that you arrange for content checking within your own organisation before submitted for publishing. The UKCultureHub review is normally managed promptly during working hours but please allow up to 24 hours for this to happen. {Will there be email notifications?}
Before creating your first bookable product please ensure that you have entered your vendor summary information which will allow your company profile and logo to be included with each bookable product that you create. Please go to the guide on setting up a UKCultureHub vendor account, if you haven’t already done this, or if you want to check the content there.
It will make the creation of a bookable product process more efficient if you upload the primary image and any others that you want to use to promote your performance in your vendor media library beforehand. You may include up to {5} images for each performance, one of which may be a movie clip (more than this and it will be rejected by the UKCultureHub review). Please use the PNG format for the images and MP4 or WebM format for best results with any movie clip. It is possible to do this later, though, if required.
To upload your media for the new bookable product, you should;
- From your site’s admin area, go to Media > Add New Media File.
- Simply drag your files to the indicated area or click on the Select Files button to select them from your storage area.
To continue to create a new bookable product, follow the steps below:
- From your site’s admin area, go to Products > Add New.
- Enter a title for your performance in the Product Name box.
- Enter a full description for your performance in the Description box. Note, there are options to add a contact form (which would only go to UKCultureHub Support) and also links to other websites. When UKCultureHub Support staff review your product before release to the marketplace they will reject any submissions which include these, so please don’t!
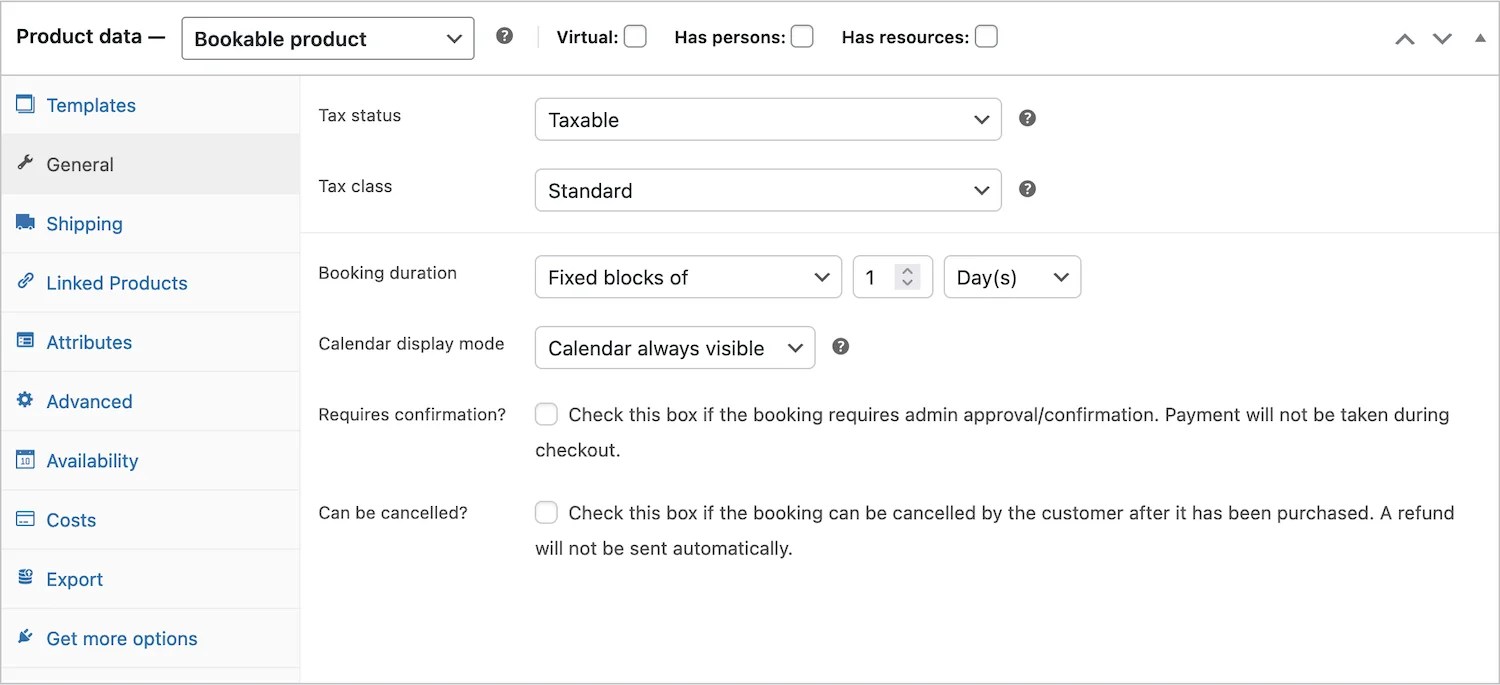
- Scroll down to the Product Data and select Bookable Product in the dropdown menu.

Selecting the Bookable product type for the dropdown
- Tick the Virtual checkbox and this will remove the Shipping tab.
- Now click through the product data tabs to configure the settings for your performance, as follows:
Bookable product’s General tab {Need to change image for UKCH actual screen}
Templates tab:
Ignore the settings in this tab.
General tab:
- Set Tax status to None, and Tax Class to Standard.
- The Booking duration determines how long a booking lasts and you should always use Day(s) even if you are offering a performance which may show more than once per day (e.g. matinee and evening shows). Then you can either choose to define the range of duration yourself (fixed blocks) or allow the venue to choose how many days they want to book subject to minimum and maximum limits that you define.
- Fixed blocks of have a set number of days that you define. The venue can only choose one block which will last the defined amount of time. For example, choose 1 day for a one day/night show, and a customer can only book one day at a time, or choose 7 days if you want to offer your performance only in week long bookings.
- Customer defined blocks of have a set duration, but the venue can choose how many blocks/days they want. Selecting Customer defined blocks reveals Minimum duration and Maximum duration fields. These fields determine the shortest and longest number of days that a venue can book the performance for.
Note if your performance has a long ‘get-in’ period requiring an additional day(s) then you must allow for this in the Minimum Duration and it is recommended that you explain this within the text you provide in the Description.
Selecting Customer defined blocks also reveals Enable Calendar Range Picker and you should check the box for this.
- Select Calendar always visible.
- Check the box for Requires Confirmation?
- Check the box for Can be cancelled? And we recommend that the period that reveals is set to 1 day.
Linked Products tab:
Ignore the settings in this tab.
Attributes tab:
- It is very important to select all the attributes which are relevant to your performance as these drive the search and filtering functions in the marketplace. This ensures that your performance can be found by your preferred venues.
- Select Add existing and a drop-down list of available attributes will appear. Select all those that are relevant to your performance, re-clicking Add existing to access the list again as many times as necessary. The attributes will appear as a list beneath.
- Now you need to click on each attribute, one by one, and a new box will appear beneath it saying Value(s):. Click Select values and a new list will appear. Select all that apply to your performance. If you make a mistake and add an incorrect one inadvertently, then simply click the X next to the value to remove it.
- In each case, leave the Visible on product page box ticked.
- Click Save attributes before moving on.
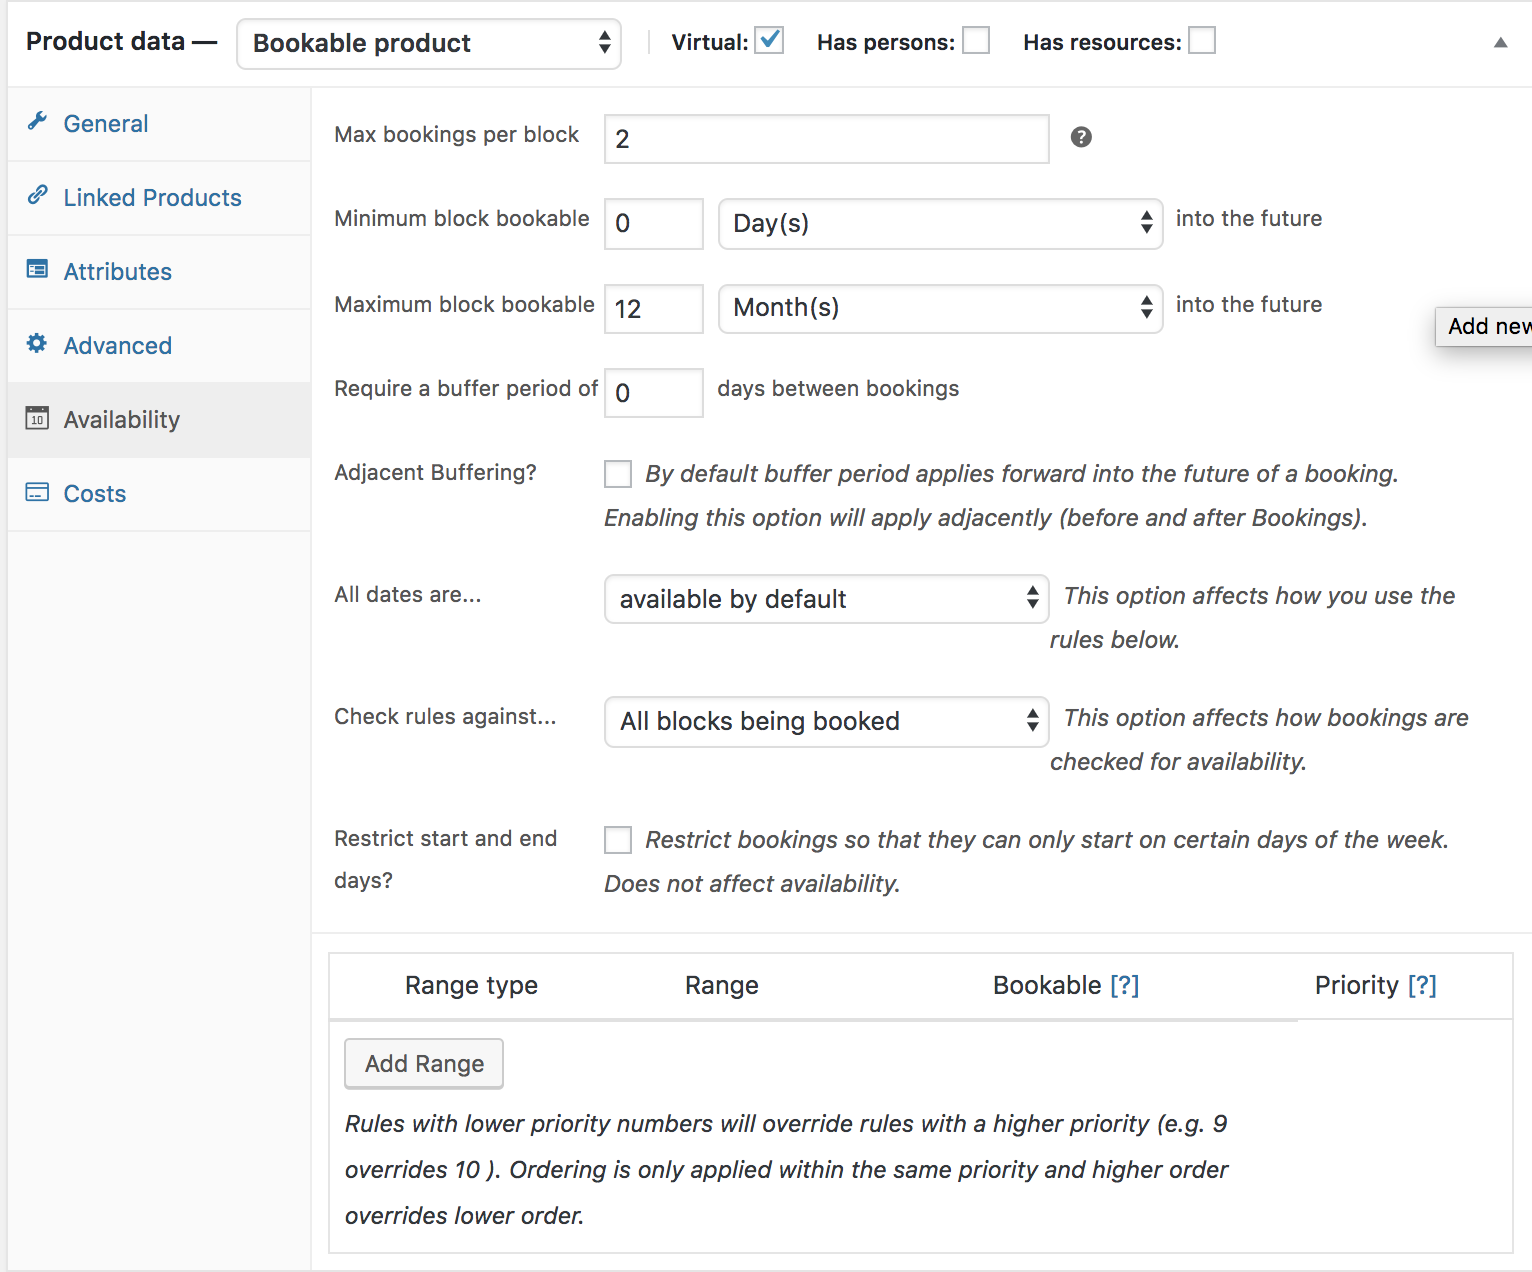
Availability tab:
The “Availability” tab in a Bookable products settings
- Set Max bookings per block to 1. This will ensure that you can take only one performance booking per day for contracting purposes. Note that if you wish to have a ‘pencilling in’ stage to your booking process then this can be set up by UKCultureHub support but you will need to indicate that to them when you submit the bookable product for review.
- The Minimum and Maximum block bookable into the future settings allow you to control how far in advance venues can book your products. Use Minimum block bookable and Maximum block bookable fields and enter the number of days or weeks in advance that you want venues to be able to book your product in these fields. For example, if you want customers to be able to book your performance at least 3 days in advance, but no more than 2 weeks in advance, you would enter 3 days in the Minimum block bookable field and 2 weeks in the Maximum block bookable field.
Note, if you want to define a custom period of time to take bookings in, for example if you are planning an eight-week tour, then use the Range settings explained further down. In this case you may still want to input a minimum period for booking in advance, for example setting the Minimum block bookable to 3 months would mean you would cease to take bookings 3 months ahead of the tour dates. To ensure that the Maximum block bookable doesn’t constrain any tour date bookings please set the time so that it is beyond the end of the last date you are specifying in the Range settings.
- You can designate a specific duration of days unavailability (buffer time) after each bookable slot. This ensures that no one else can book during that period. For instance, if you want a rest day after each booking, you can set a buffer period of 1 day. If you don’t want a buffer period leave the setting at 0 days.
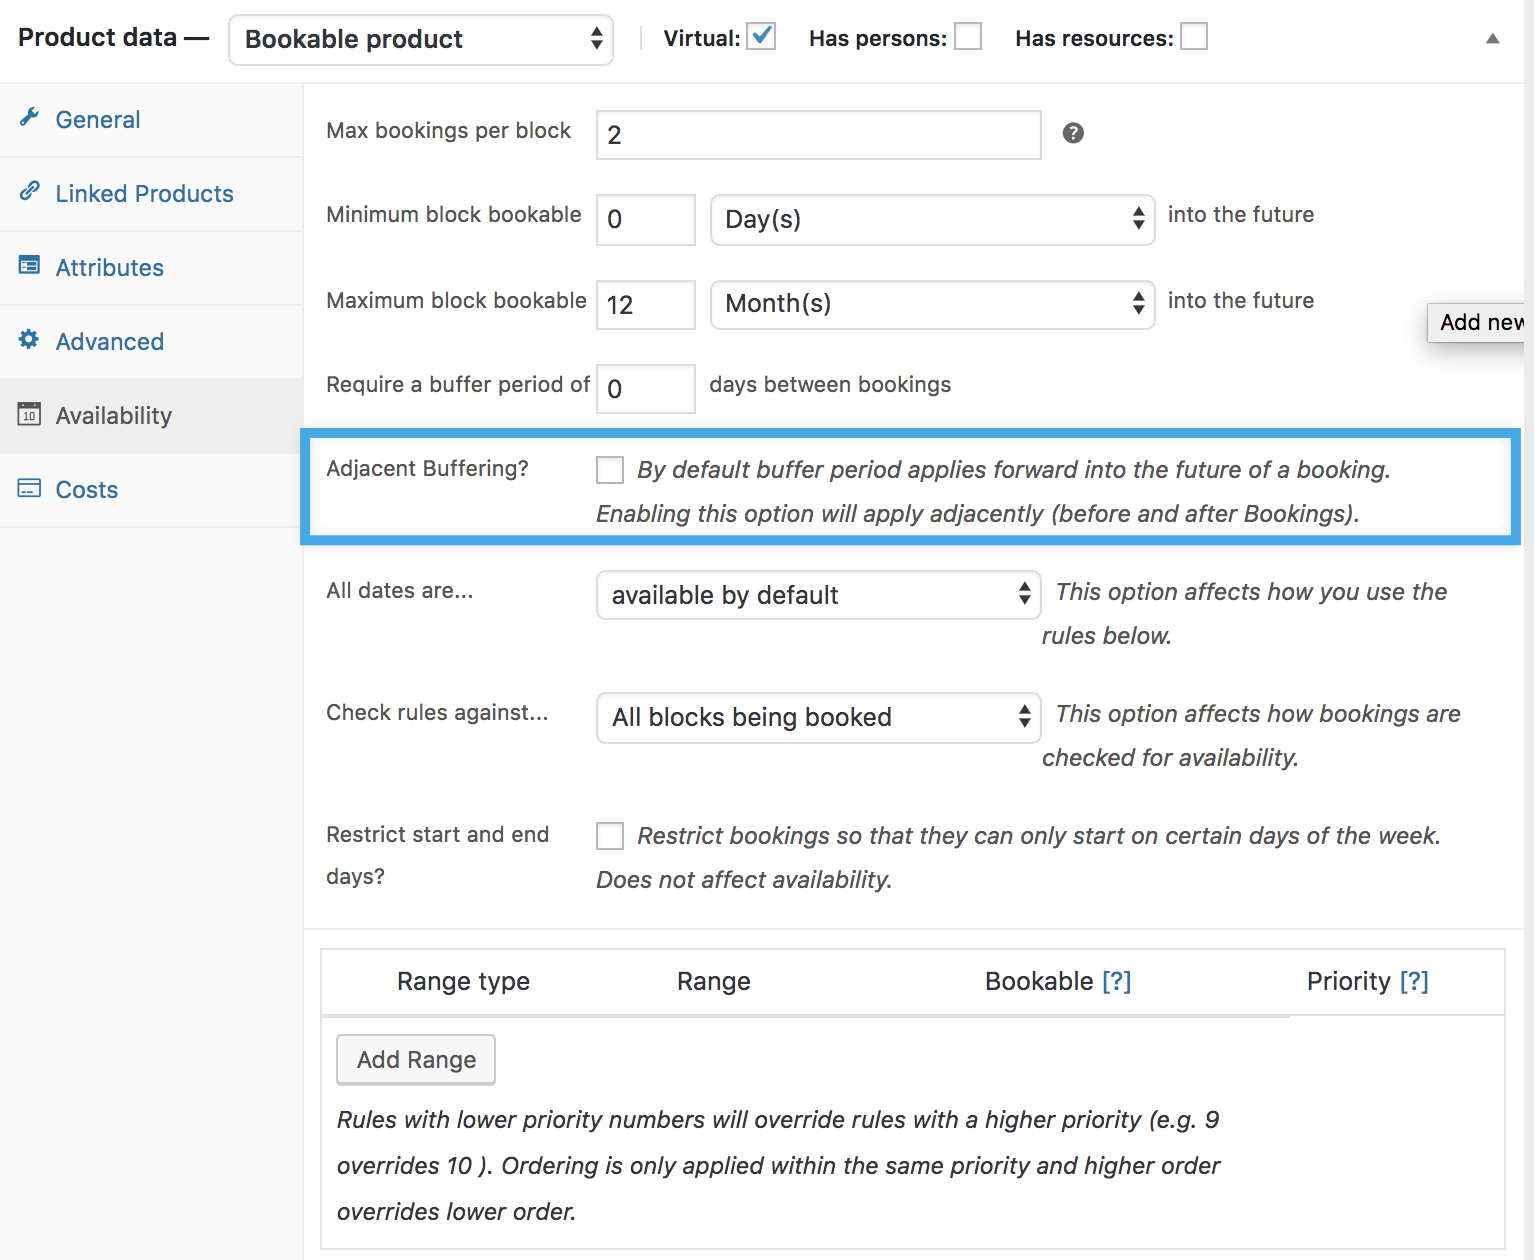
If you prefer to include a buffer both before and after your appointments, you can select the “Adjacent Buffering” checkbox:

Enabling this option adds the specified buffer duration, which cannot be booked, before and after each appointment. For example, if you define a buffer period of one day between bookings with adjacent buffering, there will be a total of 2 days between appointments.
- You can now choose the default for whether all dates are available, or not, subject to the rules which will be set below. You should set All dates are. . . not available by default if you are marketing bookings for a fixed period(s), e.g. for a tour. If you select available by default then you will need to set sufficient ‘not available’ rules to ensure venues can’t select a date that you are not intending to offer.
- Set Check rules against to All blocks being booked.
- If you only want to offer performances on certain days, then tick the box next to Restrict selectable days and then you can choose which days are the only ones that are available to be booked. For example, if you only want to offer performances at the weekend, then select Saturday and Sunday, as illustrated below):

This does not affect overall availability; other days are still available. Customers simply cannot select those days as the specific booking’s start date. So, if you want to offer weeklong bookings (i.e. you selected 7 days in the Booking Duration of the General tab (see above) and you want them to always run from Monday to Sunday, then select Monday and customers can only select a Monday on the calendar but the whole week will show as blocked on the calendar.
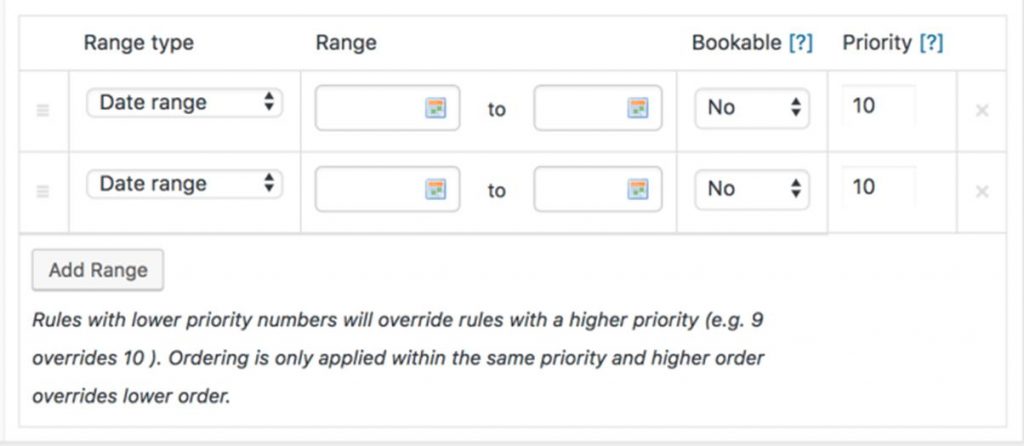
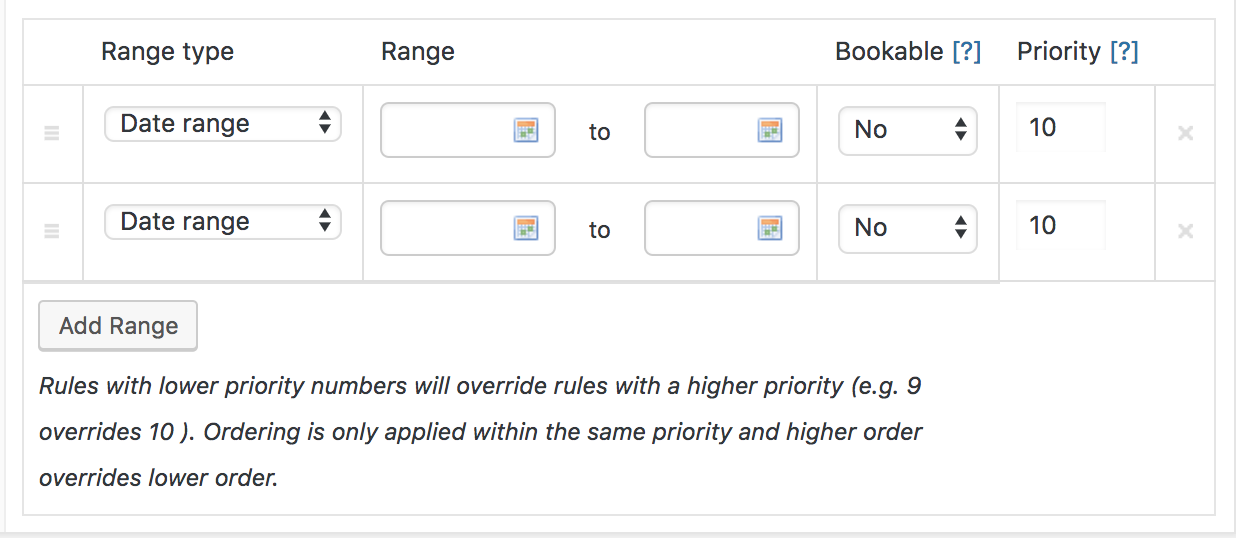
- Lastly you need to set a rule for the range of dates in which you are prepared to offer your performances, so add a rule by clicking the Add Range button to create a new rule (row):
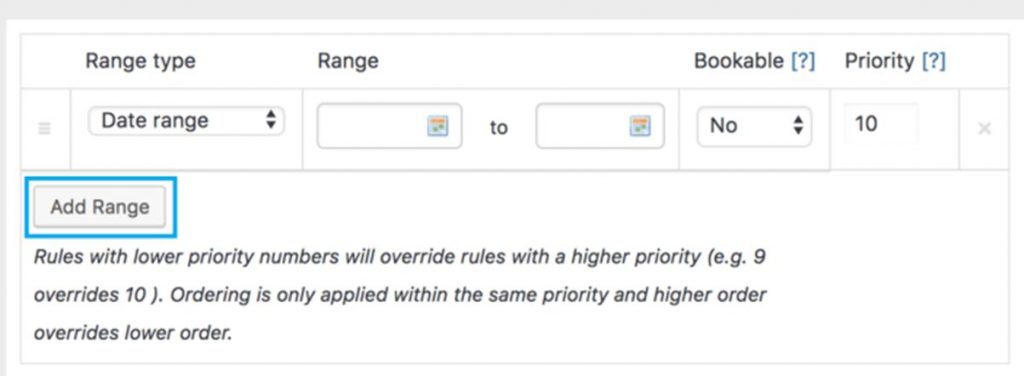
- Choose Date range from the selection of range types in the first drop down menu.
- Enter the start and stop dates in the fields that appear next to the range type.
- Set the Bookable field to Yes.
- You can ignore the Priority field, just leave it as it is.
- Click Update in the top right of the product settings to save changes.
- The image above illustrates that you can set more than one range of dates for your performance, if you wish to add additional Date range rules.
- If you want to remove a custom rule, do so by clicking the X on the far right. You can also sort them by dragging and dropping using the handle on the left.
Costs tab:
- {We need to define the principles for pricing each booking. Maybe £0 or perhaps a commission fee just for CS. This may depend on how we set up the contracting workflow. NB – maybe some simpler performande bookings would go straight to contract and not have the business case and negotiation activities}
The Costs tab controls the costs for specific slots. Continue reading about Bookable Product Cost Settings.
Export tab:
Ignore the settings in this tab.
- Enter a summary description for your performance in the Short Description box. This is the text that will appear at the top of the performance page when it is selected, so it should be a concise summary, normally one sentence or maximum two.
- Each performance in the marketplace needs a marketing image which will appear in the search results. You can now go to the Product Image box on the right of the screen and click Set product image. If you haven’t already uploaded it, you can drag an image from your own files where indicated or you can browse your own files by clicking on Select files. Then when you select your file it will be both uploaded to Media section and selected as this product image. Note that PNG is the best format for website images.
If your preferred image is already uploaded to the Media section then select Media Library in the top left of the screen and select the image that you want. Note if you have a large collection of images in the Media Library then there are filter and search options available.
When you have selected your image from the Media Library then click Set Product Image. The image will now appear on your product editing page. If you want to change the product at any time then click Remove Product Image and you can repeat the process above to add an alternative image.
- At your option, you can add additional images and/or a movie clip that can be viewed if a venue selects your performance to see the additional information. To do so go to the Product Gallery box, just beneath the Product Image box on the right hand side of the screen, and attach up to {5} images (including no more than 1 movie clip) to this bookable product by clicking on Add product gallery images and following the same upload/section process as you did for the main product image. Note that UKCultureHub will allow you to upload and select more than one movie clip, but it is our policy to only allow one, and this will be checked when we review the product before release to the marketplace.
- You will now need to set which UKCultureHub marketplace your performance will show up on. In the Product categories box on the right hand side of the screen simply tick the box next to Performances and the job is done.
- To use a Product tag in the box below Product categories is entirely discretionary. Well chosen tags may help a venue to find your performance. UKCultureHub recommends using a Product Tag for a named artist or well-known playwright, director or designer, for example.
- Lastly, and most importantly, you must select the Submit for Review button at the top right of the dashboard. This will both save the latest information that you have entered and notify UKCultureHub Support staff that it is ready for review before release onto the UKCultureHub Performances Marketplace. If you only want to save your progress and not submit it yet, then you should use the Update button at the top right instead. You can then come back to it at any time by going to Products > All products, then select the product you wish to develop further and select Edit.
Important: When you create a bookable product for your performance, as above, the system will only provide one calendar for venues to see whether the show is available or not available, so that they can propose a booking when it is unavailable. If you wish to also provide a second calendar for venues to propose ‘pencilling in’ of your performance, then this can only be set up by the UKCultureHub Support team and you will need to indicate you wish this by {describe process}.
{Describe emails that they can expect. I think this will be a submitted confirmation and then another when it is approved for release to the marketplace.}
Leave a Reply
You must be logged in to post a comment.